Showing posts with label spray paint. Show all posts

Friday, September 2, 2011

Long Weekend Plans

This Monday is Labour Day, so the end of today's work day marks the beginning of a long weekend :-)

I have a lot to do this weekend!

My room is still a disaster. These are the pictures I took right after I'd done the second trip with packed items from my apartment. Since then, I've at least put my bed back together and I gotta say, I'm pretty proud it only took me about an hour! It's the Ikea Brimnes bed (great space saver!) and it literally took me ALL night (like until 3 am!) to put it together the first time around.


I go to the CNE every year, so I'll be making a stop there on Saturday. The Saturday before Labour Day is usually the busiest day, which is less than ideal, but that's what happens when you spend every prior weekend packing and moving :-(
{via}

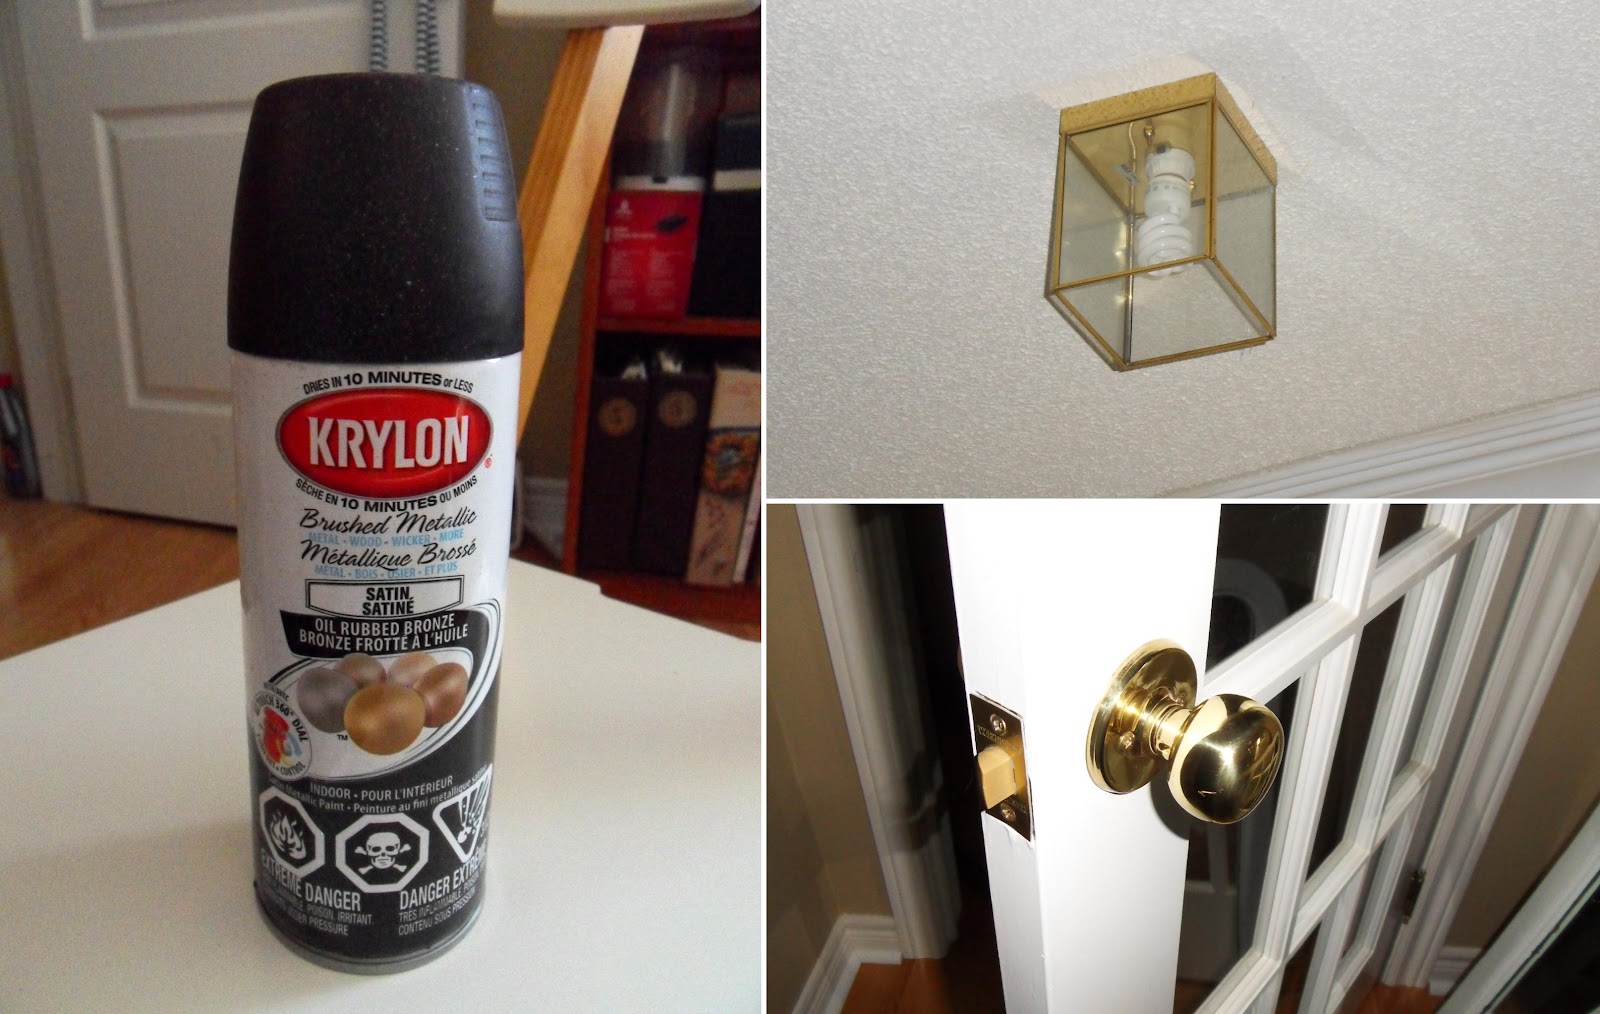
I also have been more than persuaded by Sherry from Young House Love to go out and get a can of Oil Rubbed Bronze (ORB) spray paint lol. She's like the Frank's Red Hot Sauce old lady: She uses that $hit on everything (and it looks GREAT!) I've never used it before so I'm testing it out on the frame that I bought for my Ork poster. I also have the go ahead to use it on some of the hardware in my parents' house. Almost all the fixtures in their house are brass (outdated) so my mother said I could test the door knob and hinges on the basement door (yay!) and test out the light fixtures on the first floor (which she doesn't plan on keeping anyway so she's got nothing to lose).

Do you have any exciting plans for this long weekend?

Thursday, September 1, 2011

Favourite Nooks

I had two favourite areas in my apartment: The view from the living room door and the view from the bed. 

I loved the  view from the living room door because I got to see my pretty mirror (a Craigslist find) and my shelf (the very first thing I ever spray painted) with the candles and bamboo plant (that Kevin gave to me when I started my current job).

I loved the view from the bed because I could see the lamps (Craigslist) with the shades I recovered, the French provincial dresser (Craigslist) that I painted (in the tiny bedroom and it took me days), the lamp shade that I bought from Ikea and added to the gross brass wall light fixture (that I spray painted black) and the French door (Craigslist) that my Dad helped install and cut a thin strip from because our door frame is crooked.

Unfortunately, I never did take a picture from that angle - but I sure did appreciate it while lazying around in bed on the weekend :-)

These areas will be missed!

Do you have an area in your house that makes you smile or that you're proud of?

Saturday, June 18, 2011

Weekend To-Do List

I'm an earlier riser - always have been, probably always will be. I love getting up early on a Saturday (ie: I got up at 6:30am today) and getting errands and projects done before noon. I'm usually back before Kevin even gets out of bed.


My To-Do List for this Weekend:

  • Drop off empty spray paint and regular paint cans at the hazardous waste depot. 
  • Get groceries - We live within 1 km of 4 grocery stores, so I check the flyers and shop accordingly.
  • Buy a Father's Day card for my dad.
  • Bake him something (cupcakes, cake, brownies - he's not picky lol)
  • Bring said baked good and said card to him on Sunday
  • Spray paint my cabinet -allllllmost done spray painting. The sides still look a little streaky
  • Clean the windows (inside and out - ambitious, but it needs to get done)
  • Get some work done (non negotiable!) 

To-Do lists stress me out a bit, but I think it's good to have (realistic) goals. I need to at least think about what I'd like to accomplish on my time off, otherwise I wouldn't even do half of things I'd like to do.


What are you up to this weekend?


Side note: Kevin brought me home a bike the other day and I'm LOVING it! I bought a $20 detachable basket from Canadian Tire last week for the front of the bike and it was a very practical purchase. That's how I'll be bringing my paint cans to the hazardous waste depot today. 


Here's a pic:

Tuesday, June 7, 2011

Cabinet Door = Smooth Like Buttah

Two weeks ago I blogged about a cabinet that I bought from Craigslist that I was attempting to refinish. I've had some issues with it so far, which were frustrating me (I'm not the most patient person...) so I thought I'd blog about them and show you an after shot that makes me very happy!

Here are some photos of the cabinet as I bought it:


It is a heavy, solid piece, but there was a lot of damage to the top, as you can see in the photo above. I felt confident that the stains could be sanded away, making restaining possible.  So I got my equipment ready 


and sanded down the tops and sides. I was surprised at how many of the marks came out with a little sanding! But no matter how much I sanded, I couldn't get out the red stain.


I tried restaining the top and sides anyway, even though I knew the wood wasn't even. The red stain was still visible, as demonstrated below :( 


I thought about getting a darker stain, but then decided that painting would be the way to go... but what colour?? It's so hard to choose! I was stuck between black and white (I know, they're not really colours at all, are they?) but I finally decided on white. The door to this cabinet was a pain in the arse to sand. I don't know why I thought sanding lattice would be even remotely fun. The first run with sanding and then spray painting didn't work so well. I let the door sit for a while before I took a second stab at it. The process went as follows:
  • Sand down the whole door - focus especially on the rough areas where the paint cracked in my first painting attempt
  • Spray a light coat of white primer, let it dry, then lightly sand it
  • Spray a second coat of white primer, let it dry, then lightly sand it
  • Spray a light coat of white glossy spray paint, let it dry, then lightly sand it
  • Spray a second coat of white glossy paint and let it dry for a full day
  • Jump up and down with joy because your lattice door is so PUUUURTY now!!


I just started painting the body of the cabinet. I'm hoping to have a full before and after reveal for y'all by the weekend. 

Tuesday, May 17, 2011

Medicine Cabinet Revamp

When we first moved in, the bathtub and toilet were beige... yuck. Since then, our landlord has updated our toilet to the low-flow variety and hallelujah, it's white. We can't do anything about the tub for now, but it's not so bad.. We could always close the curtains when people come over if we thought it was that bad.

So.

The medicine cabinet.

I think someone painted it beige once upon a time to match the beige toilet and tub. Whoever that "someone" was did a crap-tastic job of painting it. Since we now have a white toilet and sink, I figured I'd paint the cabinet white to match. Maybe if the cabinet were painted beige and done well, or painted white and done poorly, I would've left it alone... but a crappy beige paint job? Not in my bathroom!

Here's a before picture. It doesn't look that bad right?


Look closer....ewww


If you that thought that was gross, check out this close up! I thought Riley was my only pet.. turns out I was housing a litter of dust bunnies on my medicine cabinet!


Usually, I would use a reuseable wipe to clean up messes, some messes just call for disposables...


Note: In my excited haze, I forgot to take pictures from here on out lol...
After wiping down the surfaces, I sanded the front and edges of the cabinet door and the sides of the cabinet back. I used a slightly damp sponge to wipe away the sanding debris. I used painter's tape around the edges of the mirror and then taped old flyers to the front of the mirror. I used Krylon white primer - sprayed one coat - and waited about 1 hour before spraying 2 coats of Krylon white glossy paint. While I was waiting the paint to dry, I read the side of the spray can. It say, "Best results when air and surface temperature is 50ºF (10ºC) - 90ºF (32ºC) and humidity below 85%." Ummmmmmmmmmmm, if you don't live in Toronto or know what the weather was like here yesterday:

Source
Definitely not above 10ºC and it was drizzling. Spray painting FAIL! 

In case you're wondering what kind of DIYer I am, I'm the messy, impulsive, fly-by-the-seat-of-my-pants kind. This is what the bathroom looked like while I was painting the cabinet. My other half is a very orderly person and was less than impressed by the state of the bathroom when he got home from work... 


I'm impatient and wanted to help along my cabinet in this cold wet weather, so I brought down my blow dryer and had at it for about 10 minutes. By 10:30pm, I was reattaching the cabinet to the wall and revelling in all its new white glossy glory :-D


Here are some before and after shots.


 Before and after straight on


 Before and after zoomed in side shots (same spot)


Before and after side shot


Obviously I'm biased, but I think it looks so much better! Why didn't I do this sooner??!

Friday, May 13, 2011

I've Gone Bananas For Fruit!

(This is a repost of Wednesday's post, which mysteriously disappeared due to a Blogspot bug)

Pun intended... yes, I'm lame like that. What can I say? It's my Hump Day humour kickin' in :-)

We haven't had any fruit in our place for several days, which is very unlike me. I'm a lover of almost all fruits and veggies. They're just. so. gooood.

A few months ago, I painted a wooden platter/bowl thing that I bought from Bouclair eons ago. It was stained an espresso-ish colour, but I spray painted it. Before spray painting, I cut out little petals with tape and stuck them to the wood in a flower pattern so that when it dried I could remove the tape would still be able to see the dark stain underneath. I used this scented oil burner as my inspiration for the flower shape

The edges of the petals aren't super clean (the paint bled underneath a little bit), but overall, I was definitely happy with it. We already have a dark kitchen table, so by jazzing up the wood a bit, it helped the platter stand out from the wood of the table. Here are zoomed out and close-up shots.


 So, back to my lack-of-fruit dilemma: I pass by a fruit and veggie market every day on my way home from the subway station. Their prices are really good, so I stopped in and loaded up! Incidentally, there are no bananas in my fruit dish...I keep them on a banana-hanger thing. I like my fruits to be displayed in an organized fashion, not just haphazardly thrown into the dish. I reorganize every few days to make sure it stays as presentable as possible. If I can make it symmetrical, all the better! Here are some pics of my OCD displayed fruit dish :-) 


A full fruit dish looks good, brightens up my kitchen, and brightens up my day!

Wednesday, May 4, 2011

MacGyver Ain't Got Nothin' On Me!

Source
For some reason, there's no overhead light in the bedroom. We have a wall lamp just to the left of the door and I bought a pair of lamps on Craigslist that sit on my dresser. The wall lamp... well, there's not much I can say about it other than it was HIDEOUS.  I don't actually have an original photo of the lamp shade, but this one comes close.


One of the first things I did after moving in was switch out the lamp shade and spray paint the base with silver spray paint, so it looked like this.
I know this doesn't really look good either, but it was such an improvement that it was good enough for me. At least for the better part of a year. Today, I took it upon myself to update it once more. I detached it from the wall (if you look at the pic here, you can kinda see the brassy colour it used to be), spray painted the base matte black (using Rustoleum), and added black ribbon to the top and bottom of the shade. 

I absolutely L-O-V-E the way the matte black looks!!! It makes a huge difference. I think I could've done a better job of gluing the ribbon on though... it looks kinda bumpy :( womp womp. Maybe I'll take it off and try again, but I'd have to get new ribbon, argh!
 
If you thought the lamp re-do was why I'm saying I'm MacGyver, you're mistaken. Good guess though :P 

Short version: I MacGyver-ed open the front door with a boot lace and a bobby pin, which totally made my day and made me feel like a freakin' superstar!

Long version: I'm my excitement to get into the front enclosure to spray paint the lamp base, I locked myself out of our apartment. We have an exterior door with a deadbolt, but our interior door just has a doorknob lock and I mindlessly locked it. Sumumabeech!!! This was just before 4:30pm. Kevin and my landlord don't get home until at least after 6pm. I didn't have my cell phone. I thought, "well, it's gonna be a while until I can get back in.. might as well start spray painting" About 5 minutes later (seriously) I was done spray painting. I ended up taking a nap on our shoe stand, that ate up about 15 minutes. At about 5 I thought, "If I just pull hard enough, I'm sure the door will open. This lock is flimsy.." 1 minute of embarrassingly pathetic pulling later, I gave up and sprayed a second coat on the lamp shade. I checked my pockets for anything of use and I found a bobby pin! My dad's a locksmith so I know that's not how you open locks, no matter how many times you see on TV, but I still had over an hour to burn until anyone came home, so I gave it a try. No dice. But the whole time I was trying I kept thinking, "If this actually works, it'll be the coolest thing ever!" I pick up a boot next. Using that and the bobby pin, I looped the boot lace between the door and the frame, then pulled the ends of the lace, which depressed the door knob latch a little bit. I used the bobby pin to get under the edge of the latch and was able to move it into the door enough to open the door. I was excited it actually worked so I immediately called my dad once I got inside. Remember, he's a locksmith. His first words after I told him I'm a superstar and locks can't hold me back were, "Em, you don't have very good locks on that door if you can open it with some string and a hair pin."  Way to burst my bubble, Dad!
Related Posts Plugin for WordPress, Blogger...